It's that time again! The winter Pinterest Challenge is here. Katie and Sherry use this unofficial challenge to motivate their readers and check off a to-do from their lists. For the fall Pinterest Challenge, I submitted this pallet art. This challenge, I am going on a much smaller scale with some homemade reusable shopping bags. I got the idea from this wonderful blog, More Design Please.
This is their finished product, which I saw on Pinterest and pinned right away:
I thought this is a great idea, and something I could accomplish relatively easy. Easy once I figured out how to use my sewing machine....yeah, I know. My mom gave me a sewing maching for Christmas FIVE years ago and I have never used it. I loved the gift and thought that I would get great use out of it, but married life, college and work prevailed and I never got around to using it. This challenge gave me some courage and some get-off-your-hineyness to call my mom and get a tutorial on my five year old sewing machine.
After a quick basic this is where you put the bobbin, needle, etc I thought it would be a good idea to put foot to pedal and get sewing. I had a few old t-shirts that I have been hanging on to since high school that are sentimental, but I never wear and I thought they would be great to use as bags. They would have a function, I would see them all the time, and it would free up space in my shirt drawer.
First, I laid the shirt flat and cut off the sleeves. I cut on the side of the seam that is closest to the design on the shirt, so in other words I cut the seam off:
I also shortened the bottom of the shirt by several inches to make the bag a little smaller.
Next, I needed to cut the neck hole. When you cut the neck (after you've cut the sleeves off) it creates the "handles" on the bag.
I was working with a design on the front and back of the shirt that I wanted to keep intact so I had to be very mindful of where I was cutting. If you are less attached to the artwork on your t-shirt you can make it as scoopy as you want.
Now came time to go (wo)man versus machine. Since I was only sewing one line straight across the bottom, I did not use any pins, but feel free to pin the bottom closed to help guide you as you sew. Make sure you turn your shirt inside out before sewing. It will look nice and neat when you are all finished.
One line across is all it takes! Take your shirt, and pull the bottom through the neck hole to turn it right side out. I used my index finger to push out the corners, but you may feel inclined to use a more sophisticated tool like scissors or a pen...show-offs.
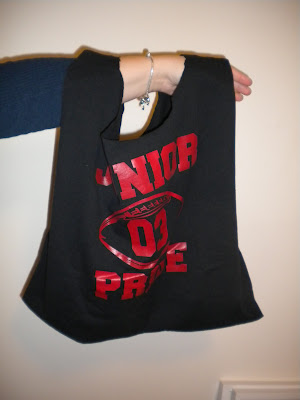
Here you go, the final product:
You know sometimes when you cut the tag out of a shirt it makes a hole in the seam? Well, I placed the tag on the inside of the shirt (when it was inside out), pinned it in place where that hole was.
I sewed the tag and the seam and when I turned the shirt inside out it looked like this:
I think it turned out really cute and it made it a little more unique. Here are all three of my t-shirt bags:
I have already used them, and gotten compliments on them! I went shopping with my friend Lisa last week (at Ikea, where else) and the cashier was like, "are those t-shirts? What a clever idea, you are a genius!" Okay, maybe I exaggerated that a little but she did think it was a cool idea :)
Alright, it's your turn. Ever make anything that you pinned on Pinterest? Let me know, I'd love some more cool ideas! Happy Friday everyone!


